I still remember the first time I made this strawberry cheesecake dump cake for a summer potluck — it disappeared before I could grab a second scoop. It’s the sort of dessert that looks and tastes like you spent all afternoon baking, but really takes minutes to assemble. Layers of sweet strawberry pie filling and fresh berries meet a smooth cream cheese layer, are topped with boxed cake mix and melted butter, and come out of the oven golden, bubbly, and irresistible.
Why you’ll love this dish
This recipe hits a sweet spot: it’s fast, simple, and crowd-pleasing. You get the tang and creaminess of cheesecake without the fuss of a water bath or long chill. The boxed cake mix does the heavy lifting for texture, and the combination of canned filling plus fresh strawberries gives both convenience and bright, fresh flavor. It’s perfect for potlucks, weeknight desserts, last-minute guests, and summer gatherings when strawberries are in season.
“I served this at a backyard BBQ and everyone asked for the recipe — such an easy, impressive dessert.” — a favorite feed-back from a recent get-together
How this recipe comes together
Think of this as assembly baking. You layer the strawberry pie filling, add fresh sliced strawberries, spread a whipped cream-cheese layer over the top, then blanket everything with dry cake mix. Melted butter is poured over the cake mix so it bakes into a golden, slightly crisp topping that contrasts with the creamy layer and saucy fruit underneath. Bake until the fruit is bubbling and the top is nicely browned, then cool a bit so slices hold together.
{image_template}
Gather these items
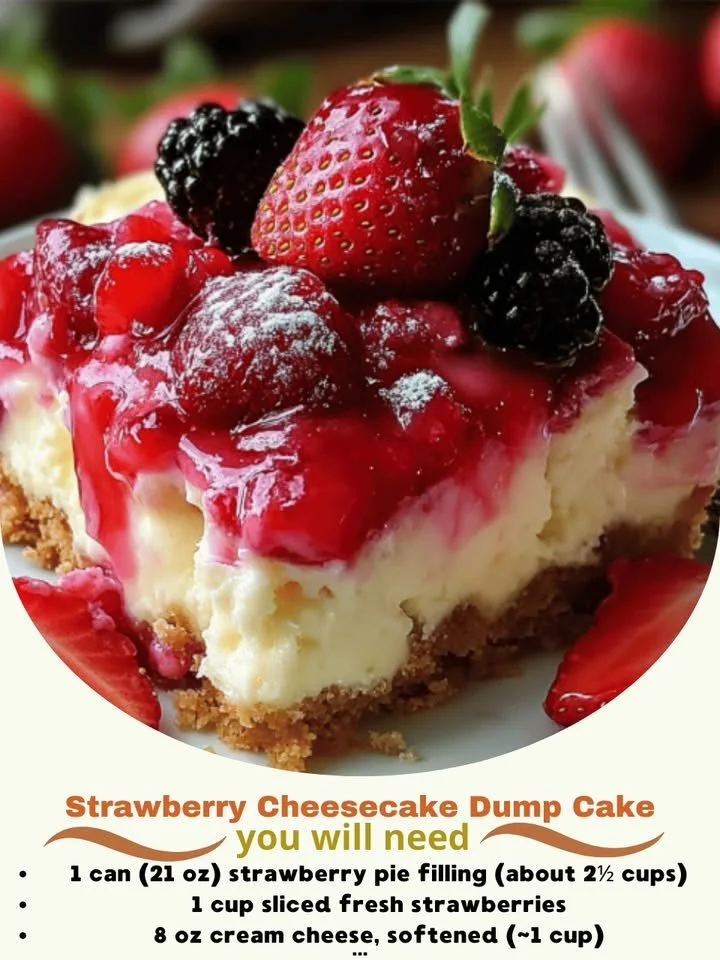
- 1 can (21 oz) strawberry pie filling (about 2 1/2 cups) — provides the juicy base
- 1 cup sliced fresh strawberries — adds freshness and texture (substitute thawed frozen strawberries, drained)
- 8 oz cream cheese, softened (~1 cup) — for the cheesecake layer (Neufchâtel for lower fat; mascarpone for extra richness)
- 1 box (15 oz) cake mix, yellow or white — the dry topping (gluten-free boxed cake mix works, see notes)
- 1/2 cup butter, melted — melts into the cake mix to form the topping
Notes and substitutions:
- If your pie filling is very runny, stir 1–2 tsp cornstarch into it to thicken slightly before layering.
- For dairy-free, use plant-based cream cheese and vegan margarine; results will be similar though slightly softer.
- If you prefer a crunchier top, sprinkle 1/2 cup chopped nuts (almonds or pecans) over the cake mix before drizzling butter.

Step-by-step instructions
- Preheat the oven to 350°F (175°C). Lightly grease a 9×13-inch baking dish.
- Spread the 21 oz can of strawberry pie filling evenly across the bottom of the prepared dish.
- Scatter the sliced fresh strawberries over the pie filling in an even layer.
- In a bowl, beat the softened cream cheese until smooth and spreadable. Carefully spread the cream cheese over the strawberries in an even layer.
- Sprinkle the dry cake mix evenly over the cream cheese layer so the surface is fully covered. Try to avoid gaps.
- Drizzle the melted butter evenly across the top so most of the cake mix gets moistened — use a spoon to help distribute if needed.
- Bake for 35–40 minutes, or until the top is golden brown and the fruit filling is bubbling at the edges. (Ovens vary — if top browns very quickly, tent with foil.)
- Let the cake cool for 15–20 minutes before serving so it firms up and is easier to scoop. Serve warm or at room temperature.
Best ways to enjoy it
- Serve warm with a scoop of vanilla ice cream or a dollop of whipped cream.
- Drizzle with extra strawberry sauce or a spoonful of the reserved pie filling for a glossy finish.
- Garnish with fresh mint leaves, a dusting of powdered sugar, or toasted sliced almonds for texture.
- Turn leftovers into parfaits: layer warmed pieces with whipped cream and fresh berries in a glass.
- Pair with coffee, tea, or a late-summer sparkling wine for a light celebration dessert.
Storage and reheating tips
- Refrigerate leftovers within 2 hours of baking. Store covered in the fridge for up to 4 days. Cream cheese-containing desserts must be kept refrigerated.
- To reheat, microwave a single serving 20–30 seconds or warm in a 300°F (150°C) oven for 10–15 minutes until heated through. Cover with foil to prevent over-browning.
- To freeze: bake the cake first, cool completely, then wrap tightly in plastic wrap and a layer of foil. Freeze up to 3 months. Thaw overnight in the fridge and reheat as above.
- If assembling to bake later, you can refrigerate the unbaked pan for up to 24 hours before baking. If you assemble and freeze unbaked, thaw fully in the fridge before baking.
Pro chef tips
- Soften the cream cheese fully to avoid lumps; a quick 20–30 second microwave (if still cold) or room-temperature sit for 30 minutes helps.
- Distribute the melted butter in small streams so the cake mix soaks evenly — uneven buttering leads to dry spots.
- If you like a more cake-like top, stir one beaten egg into the cake mix before sprinkling and proceed as directed; this creates a more cohesive crumb.
- Let the dessert rest for at least 15 minutes after baking. The filling settles and slices cut cleaner when slightly cooled.
- If the boxed mix contains pudding or extra flavors, they will change texture and sweetness — plain yellow or white gives the classic result.
Creative twists
- Berry medley: swap the pie filling for cherry or blueberry, or use a mix of berries with a little added sugar and cornstarch.
- Lemon cheesecake: add 1 tsp lemon zest to the cream cheese and use a white cake mix for a brighter flavor.
- Chocolate crunch: use devil’s food cake mix and sprinkle mini chocolate chips on top before baking.
- Gluten-free: use a certified gluten-free cake mix. The texture is slightly different but still delicious.
- Mini versions: portion into a muffin tin (lined) for single-serve dump cakes — reduce bake time to ~20–25 minutes.
- Streusel finish: mix 1/2 cup brown sugar + 1/2 cup flour + 1/4 cup cold butter + 1 tsp cinnamon and sprinkle over the cake mix before baking for a streusel top.
Your questions answered
Q: How long does this take to make from start to finish?
A: Expect about 10–15 minutes to assemble and 35–40 minutes to bake — roughly 50–60 minutes total including brief cooling.
Q: Can I use a different cake mix or make it gluten-free?
A: Yes. Yellow or white mixes are classic. Gluten-free boxed cake mixes work well; texture will vary slightly but the dessert will still be tasty.
Q: Can I make this ahead of time?
A: You can assemble and refrigerate the unbaked pan up to 24 hours before baking. If fully baked, store in the fridge and reheat portions as needed. For longer storage, freeze the baked cake (up to 3 months).
Q: How do I know when it’s done?
A: Look for a golden-brown top and bubbling fruit along the edges. Because of the layered filling, a toothpick won’t always tell the full story — rely on color and bubbling.
Q: Is the cream cheese safe if I leave the dessert out?
A: No — desserts containing cream cheese should not sit at room temperature for more than two hours. Refrigerate leftovers promptly.
Q: My pie filling was watery. How can I fix that next time?
A: Mix 1–2 teaspoons cornstarch with a tablespoon of the filling liquid, then stir back into the filling to thicken, or reduce the syrup by simmering briefly before assembling.
If you want a weekend-friendly dessert that still looks homemade and special, this strawberry cheesecake dump cake is a reliable go-to. It’s forgiving, customizable, and consistently gets compliments — exactly the kind of recipe I keep returning to.