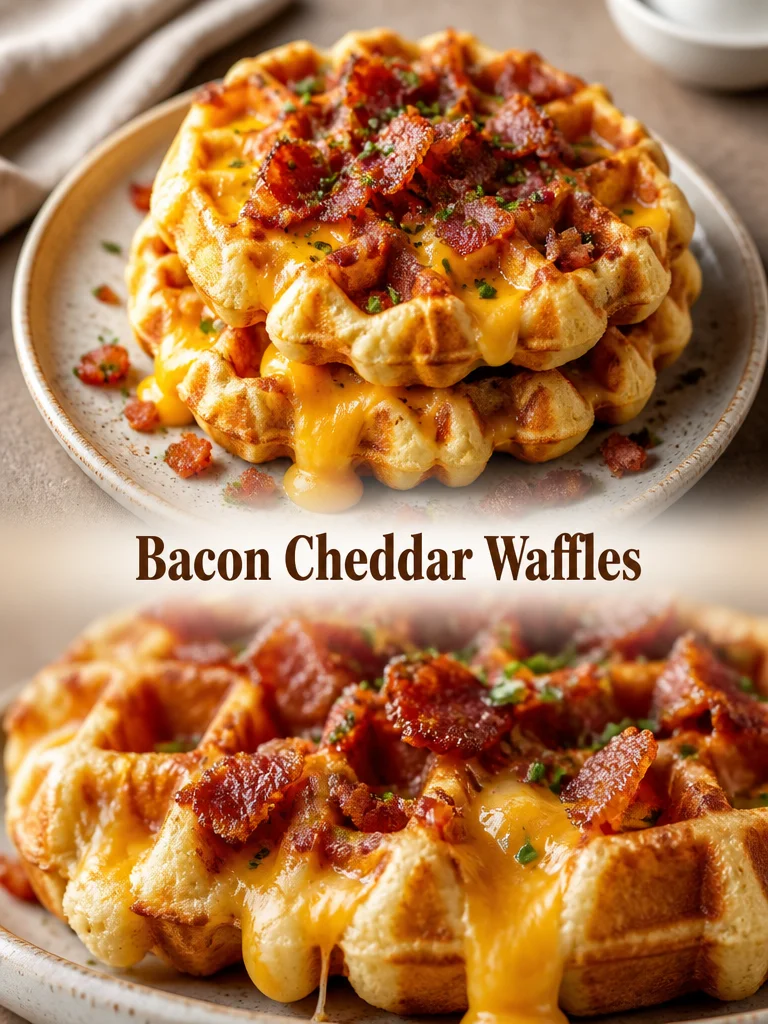
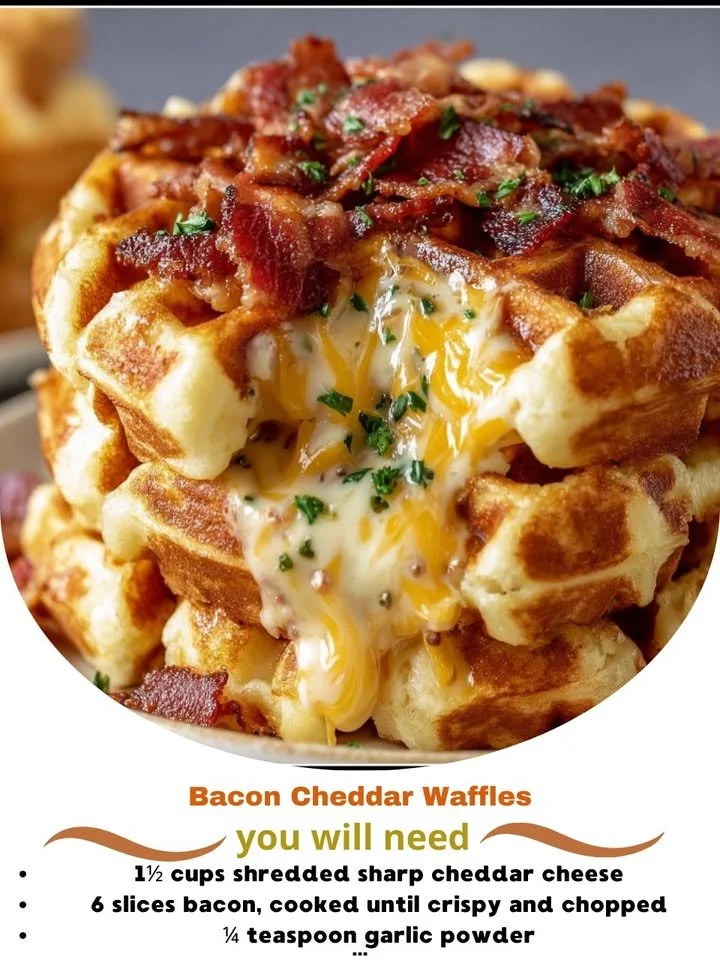
I still remember the first time I swapped maple syrup for hot sauce and dug into a bacon cheddar waffle — that crunchy, salty-savoury combo hooked me instantly. These Bacon Cheddar Waffles are a simple twist on a breakfast classic: fluffy, golden waffles studded with sharp cheddar and smoky crumbled bacon. They’re perfect for a weekend brunch, an easy dinner with a salad, or a make-ahead batch to reheat during busy weekdays.
Why you’ll love this dish
These waffles hit the sweet spot between breakfast comfort and savory satisfaction. They’re fast to make, kid-friendly, and scale easily for a crowd. Because the batter is straightforward and bakes up crisp on the outside and tender inside, you get reliably good texture every time. Use them for weekend brunch, a game-day snack, or a fun way to serve leftovers—especially when you want something more exciting than toast.
“These waffles made our Sunday brunch feel gourmet without any fuss — smoky bacon, melty cheddar, and a perfect waffle crunch.” — a satisfied brunch guest
How this recipe comes together
Before you start, expect a quick one-bowl dry mix and a small wet-mix that you fold together. The overall process:
- Whisk dry ingredients, whisk wet ingredients separately.
- Combine them gently (don’t overmix).
- Fold in shredded cheddar and crumbled bacon.
- Spoon batter into a preheated waffle iron and cook until golden and crisp.
{image_template}
Gather these items
- 1 3/4 cups all-purpose flour
- 1 tablespoon baking powder
- 1/2 teaspoon salt
- 1 cup shredded cheddar cheese (sharp cheddar for more flavor)
- 1 cup cooked and crumbled bacon (about 6–8 strips cooked crisp)
- 1 1/2 cups milk (whole milk gives best richness; 2% works fine)
- 1/4 cup vegetable oil (or melted butter for extra flavor)
- 2 large eggs
- 1 teaspoon black pepper
Notes and substitutions:
- Cheese: Grate your own cheddar for better melt and texture. Pepper Jack or Gruyère are tasty swaps.
- Bacon: Use thick-cut for more bite; cook until crisp so it stays crunchy in the waffle.
- Milk: For a dairy-free option, use unsweetened oat or soy milk and swap cheddar for vegan cheese.
- Gluten-free: Replace the all-purpose flour with a 1:1 gluten-free baking flour blend and check baking powder is gluten-free.
Directions to follow
- Preheat your waffle iron to the manufacturer’s recommended temperature. Lightly oil or spray if needed.
- In a large bowl, whisk together the flour, baking powder, and salt until evenly combined.
- In a separate bowl, beat the milk, vegetable oil, and eggs until smooth.
- Pour the wet mixture into the dry ingredients. Stir gently until just combined — small lumps are okay. Avoid overmixing.
- Fold in the shredded cheddar, crumbled bacon, and black pepper until evenly distributed.
- Spoon batter onto the hot waffle iron. Cook according to your iron’s directions until the waffles are golden brown and crispy at the edges.
- Serve the waffles warm with your preferred toppings.
Best ways to enjoy it
- Classic: A drizzle of maple syrup balances the salty bacon and sharp cheddar.
- Savory stack: Top with a fried or poached egg, a few avocado slices, and a sprinkle of chives.
- Brunch board: Serve alongside mixed greens, roasted tomatoes, and fruit for a balanced spread.
- For a twist: Add a swipe of grainy mustard or a spoonful of sour cream and chopped scallions for brightness.
- Game-day: Cut into quarters and offer with dipping sauces — spicy aioli or BBQ make great companions.
How to store & freeze
- Refrigerator: Cool waffles completely, then stack with parchment between each. Store in an airtight container for up to 3–4 days. Don’t leave cooked food at room temperature more than 2 hours.
- Freezer: Arrange cooled waffles in a single layer on a baking sheet and freeze until solid. Transfer to a freezer bag or container for up to 2 months. Freeze flat or with parchment between layers to prevent sticking.
- Reheating: For best crispness, reheat frozen or refrigerated waffles in a toaster oven or oven at 375°F (190°C) for 8–12 minutes, flipping halfway. Toaster or toaster oven works for single waffles (2–4 minutes). Microwaving will warm them but softens the crust; if you must microwave, then toast briefly afterward to regain texture. Ensure internal temperature reaches 165°F (74°C) when reheating.
Pro chef tips
- Don’t overmix: Stir until just combined. Overworking the batter creates tough waffles.
- Cheese technique: Use freshly shredded cheese. Pre-shredded cheese often contains anti-caking agents that can affect melting.
- Bacon texture: Cook bacon slightly crisp; when folded into batter it will retain some crunch and won’t make waffles soggy.
- Iron heat: A fully preheated waffle iron seals the outside quickly, producing a crisper crust.
- Batter thickness: If batter seems too thick, add a tablespoon of milk at a time until it reaches a thick but pourable consistency.
- Make-ahead hack: Cook a full batch, freeze, then reheat directly from frozen for quick breakfasts.
Creative twists
- Maple-Bacon Cheddar: Add 1 tablespoon maple syrup to the wet mix and finish waffles with extra maple for a sweet-salty profile.
- Jalapeño-Cheddar: Fold in 1–2 tablespoons minced pickled or fresh jalapeños for heat. Substitute pepper jack if you want more spice.
- Herb & Garlic: Add a teaspoon garlic powder and 1–2 tablespoons finely chopped fresh chives or parsley.
- Vegetarian: Replace bacon with smoked tempeh crumbles or store-bought vegetarian bacon bits.
- Breakfast sandwich: Use waffles as the buns and fill them with egg, spinach, and a slice of ham or turkey.
Your questions answered
Q: How long does this take from start to finish?
A: Active prep is about 10–15 minutes (mostly mixing and crumbling bacon). Cooking each waffle depends on your iron — typically 3–6 minutes each. For a small batch (4 waffles), allow about 25–30 minutes total.
Q: Can I make the batter ahead of time?
A: You can mix the dry and wet components separately and combine them 15–30 minutes before cooking. Full batter can sit in the fridge up to 4 hours, but expect the baking powder’s lift to lessen slightly, producing a denser waffle if held overnight.
Q: Can I freeze cooked waffles, and how should I reheat them?
A: Yes. Freeze on a sheet first, then bag for up to 2 months. Reheat in a 375°F (190°C) oven or toaster oven for 8–12 minutes from frozen for best texture. Aim for an internal temp of 165°F (74°C).
Q: Can I use pancake batter instead of waffle batter?
A: Pancake batter often contains more sugar and less fat, so pancakes will turn out softer and may not crisp as well. For best results, follow the waffle proportions or add a bit more fat (a tablespoon of oil or melted butter) to pancake batter.
Q: How can I make these gluten-free or dairy-free?
A: Gluten-free: Use a 1:1 gluten-free flour blend and ensure baking powder is gluten-free. Dairy-free: Use nondairy milk and a vegan cheddar alternative; choose vegetable oil instead of butter.
Q: My waffles get soggy after a few minutes — what am I doing wrong?
A: Common causes: not preheating the waffle iron, undercooking (not long enough for the crust to form), or too much wetness from undercooked bacon or watery shredded cheese. Cook bacon until crisp, preheat the iron thoroughly, and allow waffles to finish to a deep golden color for a crisper exterior.
If you want, I can format this recipe into a printable card or generate a shopping list for a specified number of servings. Which would you prefer?