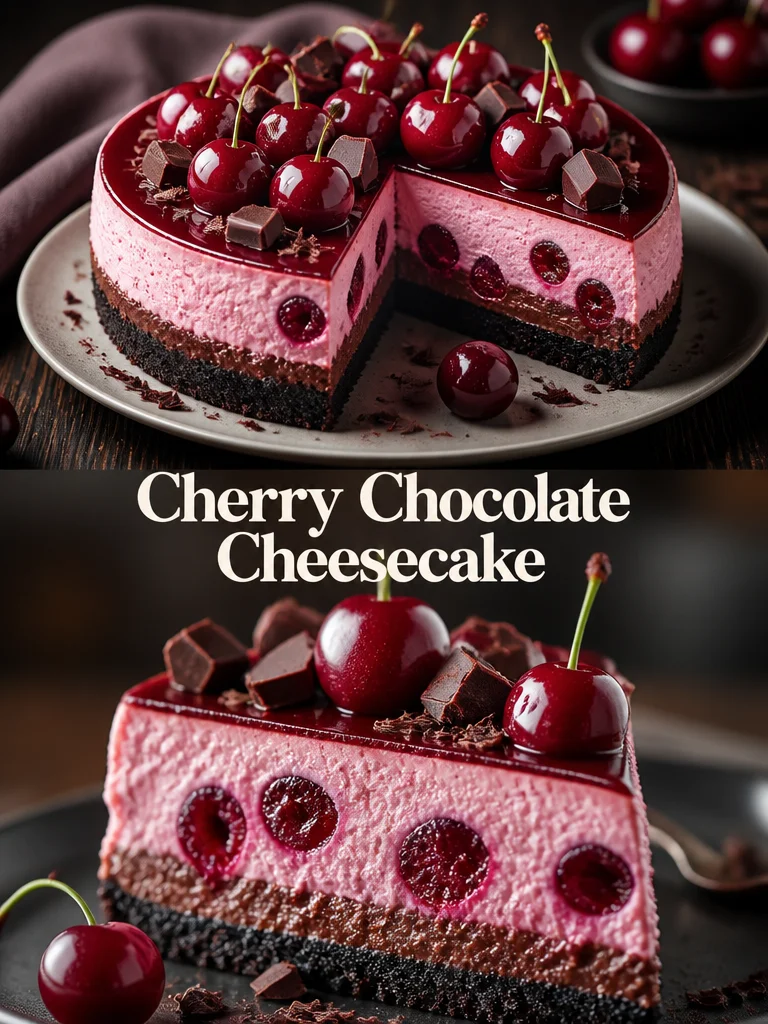
I’ve been making this Cherry Chocolate Cheesecake for years whenever I want something that feels indulgent but is still easy enough for weeknight baking. It pairs a chocolate cookie crust with a rich, chocolate-swirled cheesecake and a bright cherry topping — the contrast is what keeps people coming back for seconds.
What makes this recipe special
This cheesecake balances deep chocolate flavor with a bright cherry finish. The chocolate cookie crust gives a crisp, slightly salty base. The filling is enriched with melted semi-sweet chocolate for an extra layer of cocoa, and the cherry pie filling adds juicy sweetness and a glossy finish without any extra fuss. It’s a show-stopper for holidays, birthdays, or a casual dinner when you want something impressive but not overly complicated.
“Decadent yet approachable — the chocolate adds depth, and the cherry topping keeps every slice fresh and lively.” — a happy dessert tester
How this recipe comes together
Before you start, here’s a quick flow of what you’ll do so there are no surprises:
- Make and bake the chocolate cookie crust briefly to set it.
- Beat the cream cheese and sugar until silky, fold in sour cream and vanilla, then add eggs one at a time.
- Stir in slightly cooled melted chocolate so the filling is uniformly chocolatey.
- Bake the cheesecake until the center is set but still slightly jiggly; cool slowly in the oven to prevent cracks.
- Top with cherry pie filling after it’s cooled, then chill thoroughly so it slices cleanly.
{image_template}
Gather these items
- 2 cups chocolate cookie crumbs (Oreos or chocolate graham crackers; about 20–24 cookies)
- 1/2 cup unsalted butter, melted
- 24 oz cream cheese, softened (three 8-oz blocks)
- 1 cup granulated sugar
- 1 cup sour cream (can substitute full-fat Greek yogurt for a tangier profile)
- 4 large eggs, at room temperature
- 1 tsp vanilla extract
- 1 cup semi-sweet chocolate chips, melted and slightly cooled
- 1 (21 oz) can cherry pie filling
- Optional: fresh cherries or chocolate shavings for garnish
Notes/substitutions:
- For a lighter option, use Neufchâtel or reduced-fat cream cheese, but texture will be a bit softer.
- Make the crust gluten-free by using gluten-free chocolate cookies.
- If you don’t have sour cream, plain full-fat Greek yogurt works well in the filling.

Step-by-step instructions
- Preheat the oven to 325°F (160°C). Grease a 9-inch springform pan and line the bottom with parchment for easier removal.
- Combine the chocolate cookie crumbs and melted butter in a bowl. Press the mixture firmly into the bottom (and a little up the sides, if you like) of the springform pan. Bake the crust for 10 minutes. Remove and set aside to cool slightly.
- In a large bowl, beat the softened cream cheese and sugar until completely smooth and free of lumps. Scrape the bowl as needed.
- Mix in the sour cream and vanilla extract until combined.
- Add the eggs one at a time, beating briefly after each addition. Don’t overmix — stop as soon as each egg is incorporated.
- Fold the melted, slightly cooled chocolate into the batter until it’s evenly distributed and the filling is smooth.
- Pour the filling over the prepared crust and smooth the top.
- Bake for 50–60 minutes. The cheesecake is done when the edges are set and the center still has a slight jiggle (it will firm up while cooling).
- Turn the oven off, crack the door open slightly, and let the cheesecake cool in the oven for 1 hour. This gradual cooling reduces the risk of cracks.
- Remove the cheesecake and let it finish cooling at room temperature. Once cooled, spread the cherry pie filling evenly over the top.
- Refrigerate the cheesecake for at least 4 hours, preferably overnight, before slicing.
- Garnish with fresh cherries or chocolate shavings just before serving.
Best ways to enjoy it
- Slice with a hot, thin knife (dip in hot water and wipe dry between cuts) for clean edges.
- Serve chilled with a small dollop of whipped cream or a scoop of vanilla ice cream.
- Pair with coffee or a dessert wine like a late-harvest Riesling or a ruby port to complement the cherries.
- For parties, make mini cheesecakes in muffin tins using the same process for portable servings.
How to store & freeze
- Refrigeration: Keep leftovers covered with plastic wrap or stored in an airtight container. Consume within 4–5 days.
- Freezing whole: Wrap the chilled cheesecake tightly in plastic wrap and then foil. Freeze up to 2 months. Thaw in the refrigerator overnight before serving.
- Freezing slices: Individually wrap slices in plastic and place in a freezer bag. Thaw in the fridge.
- Food safety: Once the cheesecake contains eggs and dairy, refrigerate within 2 hours of baking or topping. Always discard if left out longer.
Pro chef tips
- Room-temperature ingredients: Let cream cheese and eggs sit out for 30–60 minutes. This prevents lumps and ensures a smooth filling.
- Avoid overbeating: Overmixing incorporates air, which can cause cracks and a spongy texture. Mix just until combined.
- Melt chocolate gently: Use a microwave in 20–30 second bursts or a double boiler. Let it cool slightly so it doesn’t cook the eggs in the batter.
- Prevent cracks: Cooling slowly in the oven and not overbaking are the two most effective methods. A water bath helps if you’ve had cracking issues before — wrap the pan’s bottom tightly in foil and place it in a shallow pan with an inch of hot water.
- Chill fully: For neat slices, chill overnight. Slightly warm your knife before cutting for polished pieces.
Creative twists
- Cherry swirl: Drop spoonfuls of cherry filling into the batter and swirl gently before baking.
- Dark chocolate kick: Use bittersweet chocolate for a more intense cocoa flavor.
- Nutty crust: Mix 1/2 cup finely chopped toasted pecans or almonds into the cookie crumbs.
- Mini cheesecakes: Make individual portions in a muffin tin with paper liners; reduce baking time to 20–25 minutes.
- Dairy-free: Use dairy-free cream cheese and coconut cream (and a dairy-free chocolate) — texture will be different but still delicious.

Your questions answered
Q: Can I use fresh cherries instead of canned cherry pie filling?
A: Yes. If using fresh cherries, cook them down with a little sugar and lemon juice until syrupy (about 10–15 minutes) or toss them with a cornstarch slurry and warm until thickened. The canned filling provides immediate shine and stability, but fresh is more vibrant.
Q: How can I tell when the cheesecake is fully baked?
A: The edges should look set and slightly puffed. The center should still have a gentle jiggle when you shake the pan. It will firm up as it cools. Avoid a liquid center — that indicates underbaking.
Q: Why did my cheesecake crack, and how do I prevent it?
A: Cracks usually come from overbaking, sudden temperature changes, or excess air in the batter. To prevent them: mix gently, don’t overbake, cool the cheesecake slowly with the oven door cracked, and consider a water bath if you often get cracks.
Q: Can I make this ahead for a party?
A: Absolutely. In fact, this cheesecake benefits from chilling overnight. Make it a day or two ahead, store covered in the fridge, and add garnishes just before serving.
Q: What if I don’t have a springform pan?
A: A regular cake pan can work, but removal is trickier. Line the pan with parchment overhanging the edges to lift the cheesecake out. Make sure to protect it well if using a water bath.
Q: How long does this cheesecake keep in the freezer?
A: Up to 2 months for best quality. Thaw overnight in the refrigerator before serving.
Enjoy making this Cherry Chocolate Cheesecake — it’s a dessert that looks like you spent hours on it, while much of the pleasure comes from simple, well-executed steps.