
I grew up on anything that combined a flaky crust with melty cheese and spiced beef — this Taco Pie hits that exact comfort note. It’s a simple, no-fuss weeknight dinner that tastes like a taco night collapsed into one glorious pie: seasoned ground beef, a room-temperature egg to bind things, salsa for brightness, and a blanket of cheddar-jack on top. Fast to assemble, easy to customize, and extremely family-friendly, it’s one of those recipes that disappears fast at the table.
Why you’ll love this dish
This Taco Pie is the kind of recipe you make when you want taco flavor with less cleanup. It’s quick (30–40 minutes total), uses a pre-made refrigerated crust to save time, and stretches a pound of beef into four to six hearty servings. It’s also kid-approved: familiar taco flavors, mild spice by default, and a crunchy crust that makes it feel special without extra work.
- Budget-friendly: a little beef and a block of cheese go a long way.
- Versatile: easy to swap proteins or add veggies.
- Make-ahead friendly: assemble in advance if you need to.
- Crowd-pleasing: perfect for potlucks, casual dinners, or game day.
“I tossed this together for a busy Thursday and it was an instant hit — cheesy, comforting, and so easy to customize.” — home cook review
Step-by-step overview
You’ll brown the beef with onion and pepper, drain it, then stir in salsa and taco seasoning. The filling goes into an unbaked pie crust, you pour a whisked egg over the mixture to help everything set, top with shredded cheddar-jack, and bake until the crust is golden and the cheese is melted. Expect about 25–30 minutes in the oven (follow the pie crust package for oven temperature or use ~375°F / 190°C if unspecified).
{image_template}
What you’ll need
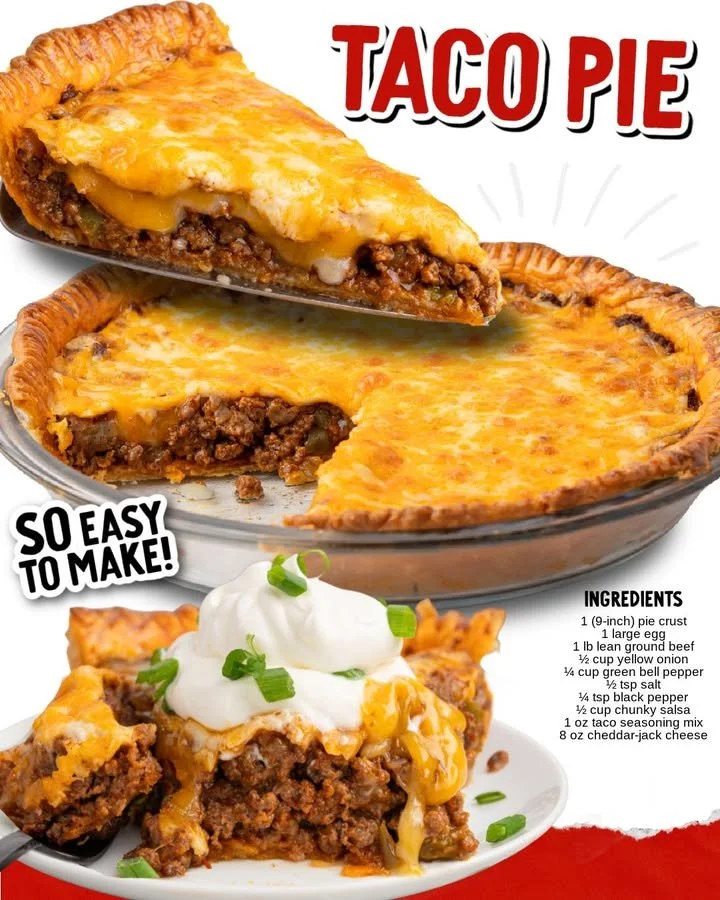
- 1 (9-inch) pre-made refrigerated pie crust
- 1 large egg, room temperature
- 1 lb (450 g) lean ground beef
- 1/2 cup small yellow onion, diced
- 1/4 cup small green bell pepper, diced
- 1/2 tsp salt
- 1/4 tsp ground black pepper
- 1/2 cup chunky salsa
- 1 oz packet taco seasoning mix
- 8 oz block cheddar-jack cheese, shredded
Notes and substitutions:
- Swap ground turkey or chicken for beef to lighten it up. If using turkey, check seasoning since lean turkey can taste milder.
- Make it vegetarian: use cooked black beans or seasoned lentils in place of beef; reduce the egg or use a flax "egg" if you need vegan (note: texture will differ).
- Use a low-sodium taco seasoning or a homemade blend (chili powder, cumin, garlic powder, onion powder, paprika, a pinch of cayenne).
- Freshly shredding a block of cheese melts better than pre-shredded varieties that contain anti-caking agents.

Step-by-step instructions
- Preheat the oven according to the pie crust package. If the package doesn’t give a temp, preheat to 375°F (190°C).
- Heat a skillet over medium. Add the ground beef, diced onion, and green bell pepper. Break the beef into small pieces with a spoon as it cooks.
- Cook until the beef is no longer pink and the vegetables are softened, about 6–8 minutes. Drain excess fat into a heatproof container.
- Return the skillet to low heat. Stir in salt, black pepper, salsa, and the taco seasoning packet. Cook 2–3 more minutes until everything is combined and heated through. Taste and adjust seasoning.
- In a small bowl, whisk the room-temperature egg until smooth. This will help the filling set and keep the top cohesive.
- Place the pie crust in a 9-inch pie dish (if it’s on a removable tray, press gently to fit). Spoon the beef mixture into the crust and spread it into an even layer.
- Pour the whisked egg over the beef, tilting the pie dish if needed so the egg distributes.
- Sprinkle the shredded cheddar-jack evenly over the pie.
- Bake in the preheated oven until the crust is golden and the cheese is melted and bubbly, about 25–30 minutes. If you par-baked the crust, watch closely to avoid over-browning.
- Let the pie rest a few minutes before slicing so the filling sets. Serve warm.
Food safety note: ground beef should reach 160°F (71°C) when cooked.
Best ways to enjoy it
- Classic toppings: dollops of sour cream, a few spoonfuls of guacamole, chopped cilantro, and sliced green onions.
- Serve with: Spanish rice or cilantro-lime rice, refried or black beans, a crisp green salad, and tortilla chips for crunch.
- For a casual buffet, cut into squares and serve with small bowls of salsa, pickled jalapeños, and hot sauce so guests can customize.
Storage and reheating tips
- Refrigerate: Cool to room temperature within two hours, then store covered in the fridge for 3–4 days.
- Reheat in oven: Place slices on a baking sheet and reheat at 350°F (175°C) for 10–15 minutes, or until heated through and the crust is crisp.
- Microwave: Quick option for single slices (about 60–90 seconds on high), but expect a softer crust. Use the oven if you want crispiness back.
- Freeze: Baked pie freezes well. Wrap tightly in foil and store up to 2 months. To reheat, thaw in the fridge overnight and warm in a 350°F oven for 20–30 minutes. You can also assemble in a disposable foil pan and freeze unbaked; thaw overnight and bake an extra 10–15 minutes.
- Safety: Don’t leave the pie out at room temperature longer than two hours to avoid bacterial growth.
Helpful cooking tips
- Drain well: Excess fat will make the filling soupy and can sog up the crust. Drain and blot with a paper towel if needed.
- Prevent a soggy bottom: For an especially crisp crust, blind-bake the crust for 5–7 minutes before filling. Let it cool slightly, then add the filling and continue as directed.
- Even melt: Shred cheese from a block. It melts creamier than pre-shredded varieties.
- Adjust spice: Start with half the taco seasoning if you prefer milder flavors, then add more to taste.
- Make it portable: Use a pie dish with a removable bottom or bake in a foil pan to transport to potlucks easily.
Creative twists
- Chicken Taco Pie: Use shredded rotisserie chicken mixed with salsa and taco seasoning instead of beef. Add a squeeze of lime.
- Vegetarian: Mix black beans, corn, and sautéed mushrooms with taco spices. Use an egg substitute for vegan versions and dairy-free cheese.
- Breakfast Taco Pie: Add cooked breakfast sausage or chorizo and crack a few eggs into the top in the last 10–12 minutes of baking so the eggs set.
- Spicy version: Stir in chopped canned or fresh jalapeños, hot salsa, or a pinch of cayenne.
- Crust swaps: Use a refrigerated biscuit dough for a rustic crust or go crustless for a low-carb bake (increase the egg to 2 for better binding).
Common questions
Q: Can I make this taco pie ahead of time?
A: Yes. You can assemble it and refrigerate, covered, for up to 24 hours before baking. If you assemble and refrigerate, bake for the same time but check that the center is hot (and the crust golden). For longer storage, fully bake and then refrigerate or freeze.
Q: What if my pie crust package doesn’t list a temperature?
A: If no temp is listed, preheat to 375°F (190°C). That’s a safe middle ground for most refrigerated pie crusts and will crisp the bottom without burning the edges. If your crust bakes at a higher temp on the box, follow the box directions.
Q: Can I use pre-shredded cheese?
A: You can, but pre-shredded often contains anti-caking agents that slightly affect melting. Shredding a block yields creamier melt and better texture.
Q: Why pour an egg over the beef?
A: The whisked egg acts like a light custard binder; it helps the filling hold together when you slice the pie and gives a slightly richer texture. If you prefer not to use egg, the pie will still hold together but may be a bit looser.
Q: How long can I freeze leftovers?
A: Baked slices freeze well for up to 2 months. Wrap tightly to prevent freezer burn. Thaw in the fridge overnight before reheating.
If you want, I can write a printable card-style recipe version of this Taco Pie for your recipe index or create a shopping list organized by store sections. Which would be most useful?