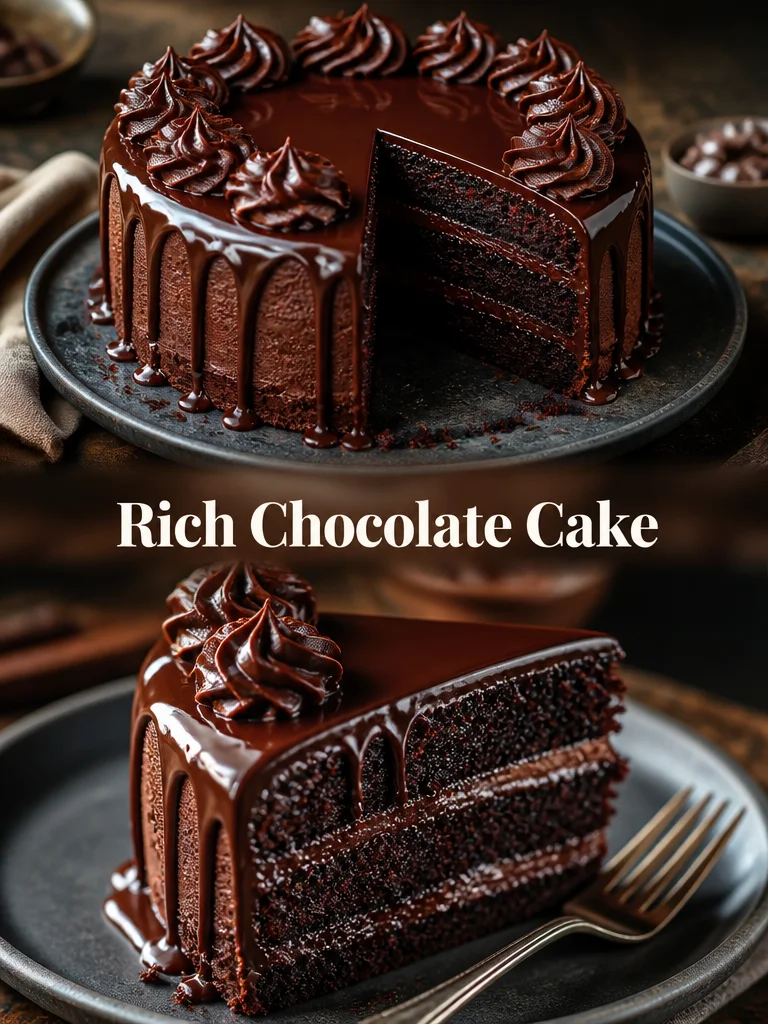
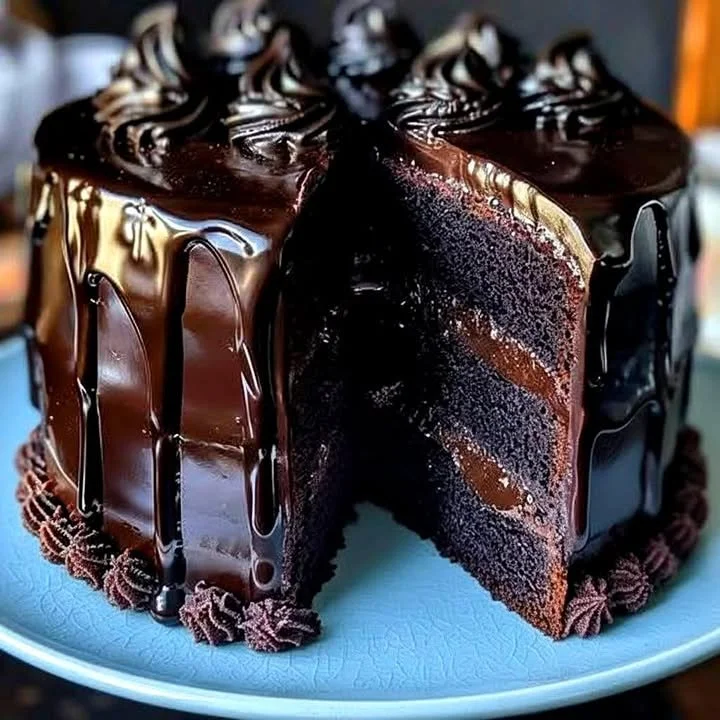
I’ve baked this Rich Chocolate Cake more times than I can count — it’s the go-to when I want something reliably moist, deeply chocolatey, and quick enough for a last-minute celebration. The batter comes together in one bowl, a splash of boiling water unlocks the cocoa’s flavor, and you end up with tender layers that take frosting beautifully. It’s the kind of cake that hits nostalgia and comfort at the same time.
Why you’ll love this dish
This cake delivers a big chocolate flavor with minimal fuss. It’s:
- Easy: One-bowl mixing (except for the boiling water) means fewer dishes and a fast turnaround.
- Consistently moist: Oil and hot water keep the crumb tender and soft for days.
- Versatile: Frost it simply, turn it into cupcakes, or dress it up for a party.
- Budget-friendly: Pantry staples create a bakery-style cake without specialty ingredients.
“Rich, chocolatey, and so forgiving — perfect for birthdays and midweek cravings.” — a Sunday-baking convert
How this recipe comes together
Quick overview: you whisk the dry ingredients, add the wet ones until everything is smooth, then stir in boiling water. That last splash thins the batter and blooms the cocoa, giving a deeper, more even chocolate flavor. Pour into two greased 9-inch pans, bake about 30–35 minutes, cool, and then frost.
{image_template}
Gather these items
- 1 3/4 cups all-purpose flour (spoon into the cup and level; or use 1 3/4 cups cake flour for a slightly finer crumb)
- 3/4 cup unsweetened cocoa powder (use Dutch-process for darker flavor or natural cocoa if that’s what you have)
- 2 cups granulated sugar
- 1 1/2 teaspoons baking powder
- 1 1/2 teaspoons baking soda
- 1 teaspoon fine salt
- 2 large eggs (room temperature is best)
- 1 cup whole milk (or use buttermilk for extra tang and tenderness)
- 1/2 cup vegetable oil (neutral oil keeps it moist; swap for melted butter for a richer note)
- 2 teaspoons vanilla extract
- 1 cup boiling water (or hot coffee for a mocha boost)
Notes: Swap hot coffee for the boiling water for added depth. For a dairy-free cake, use a plant-based milk and a neutral oil; see Variations for vegan swaps.
Directions to follow
- Preheat the oven to 350°F (175°C). Grease two 9-inch round cake pans and line the bottoms with parchment for easy release.
- In a large bowl, whisk together the flour, cocoa powder, sugar, baking powder, baking soda, and salt until evenly combined.
- Add the eggs, milk, vegetable oil, and vanilla. Mix with a spatula or electric mixer on low until the batter is smooth and no streaks remain. Don’t overmix.
- Pour the boiling water in slowly while stirring gently. The batter will become thin — that’s normal and helps create a tender crumb.
- Divide the batter evenly between the prepared pans, smoothing the tops with a spatula.
- Bake for 30–35 minutes, rotating halfway if your oven has hot spots. A toothpick inserted in the center should come out clean or with a few moist crumbs.
- Let the cakes rest in the pans for 10 minutes. Run a knife around the edges, invert onto wire racks, and remove the parchment. Cool completely before frosting.
- Once cooled, frost with your favorite chocolate frosting. For a neat finish, apply a thin crumb coat, chill 20–30 minutes, then add the final layer of frosting.
What to serve it with
- Classic chocolate buttercream or ganache for an indulgent finish.
- A scoop of vanilla or salted caramel ice cream for contrast.
- Fresh berries (raspberries or strawberries) and a dusting of cocoa or powdered sugar for brightness.
- Espresso or a bold dark roast coffee to enhance the chocolate notes.
- For a dessert platter, serve thin slices alongside caramel sauce, toasted nuts, or whipped cream.
How to store & freeze
- Room temperature: If unfrosted, cover tightly and keep at room temperature for up to 2 days. Frosted cakes with a buttercream topping are fine at room temp for 1–2 days in a cool place.
- Refrigeration: If your frosting contains perishable dairy (cream cheese or whipped cream), refrigerate. Keep in an airtight cake container or loosely covered with plastic wrap for up to 5 days. Bring to room temperature before serving for best texture and flavor.
- Freezing: Wrap cooled, unfrosted layers tightly in plastic wrap, then foil. Freeze up to 3 months. Thaw in the refrigerator overnight or on the counter for a few hours. If frozen with frosting, note some frostings can change texture; buttercream usually thaws nicely, while whipped cream-based frostings are best added after thawing.
- Food safety: Don’t leave frosted cake with perishable filling out at room temperature longer than 2 hours.
Pro chef tips
- Measure flour properly: spoon flour into the cup and level off rather than scooping directly to avoid a dense cake.
- Use room-temperature eggs and milk for a smoother batter and better rise.
- Sift or whisk cocoa powder to break lumps — it helps the batter blend evenly.
- Don’t skip the boiling water: it intensifies cocoa flavor and keeps the crumb moist. For more complexity, use hot brewed coffee instead.
- Avoid overmixing once the flour is added. Overworking develops gluten and can make the cake tough.
- Check doneness with a toothpick and a gentle press — the cake should spring back slightly.
- For even layers, weigh the batter into each pan or divide it with a measuring cup.
- When frosting, chill the filled cake for 15–30 minutes for a cleaner crumb coat and smoother final finish.
Creative twists
- Mocha twist: Use hot strong coffee instead of boiling water and add 1 teaspoon espresso powder to the batter.
- Orange-chocolate: Add 1 tablespoon grated orange zest to the batter and use orange buttercream.
- Peanut butter swirl: Dollop peanut butter between the layers and swirl into the frosting.
- Gluten-free: Replace all-purpose flour with a 1:1 gluten-free baking flour blend that contains xanthan gum.
- Vegan adaptation: Use a flax egg (1 tbsp ground flax + 3 tbsp water per egg), non-dairy milk, and a neutral oil; substitute baking powder/soda adjustments may be needed for lift.
- Cupcakes or sheet cake: Bake in lined cupcake tins for 18–22 minutes or pour into a 9×13 pan and bake 25–30 minutes.
Common questions
Q: How long does this cake take from start to finish?
A: Active prep is about 15 minutes. Baking is 30–35 minutes, plus cooling time (at least 1 hour before frosting). Plan roughly 2 hours from start to finished, or longer if you chill between frosting steps.
Q: Why is the batter thin after adding boiling water? Is that okay?
A: Yes — the hot water thins the batter and blooms the cocoa, which enhances flavor and keeps the crumb moist. Expect a thinner batter than typical butter cakes.
Q: Can I use coffee instead of boiling water?
A: Absolutely. Hot brewed coffee or espresso deepens the chocolate flavor. Use the same volume (1 cup).
Q: Can I make this cake in a single 9×13 pan?
A: Yes. Bake at 350°F but check earlier — a 9×13 pan will usually take 25–30 minutes. Use the toothpick test for doneness.
Q: How do I get even layers?
A: Weigh the batter or divide it evenly with a measuring cup. Tap pans gently on the counter to release air bubbles. If domed, level with a serrated knife once cooled.
Q: Is this recipe freezer-friendly?
A: Yes. Cool layers completely, wrap tightly, and freeze up to 3 months. Thaw in the fridge overnight before frosting.
If you want, I can write a matching chocolate buttercream recipe and step-by-step photos to go with this cake. Which would you like next?